
Table of Contents
Introduction
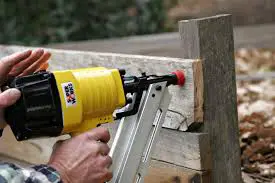
Nail guns are efficient tools that save you from the stress of using a hammer to drive nails manually. They are one of the most satisfying and incredible power tools to use; if you are into DIY projects, you should consider purchasing this tool. As incredible as the nail gun may seem, it needs to be handled with care and maintained properly. Learning how to reload and maintain the nail gun is the first step to take after purchasing this tool. There’s a basic step-by-step process for learning how to load a nail gun; however, some nail gun models have their unique loading mechanism that may be a bit different from the general process.
Typically, all nail guns are built to accommodate nail strips that are held together by glue or plastic. These nails are fixed in the magazine and are pushed into the tool’s barrel by springs. The nails are driven into the material by compressed air or with the help of an electric motor. In this article, we will provide you with the general process as well as the unique loading mechanisms of some models.
To know more about nail guns, see
Best Electric Nail Guns in 2020
What Kind of a Nail Gun Do I Need?
How To Load A Nail Gun
Below are some of the basic steps to follow when loading a nail gun
Disconnect and Unload The Magazine
The first thing to do before loading your nail gun is to disconnect the air source and power source. After that, inspect the magazine to see if there are nails left. Empty the magazine if there are nails in it; this is to make sure there are no jammed nails.
Connect the Air Compressor
It is advisable to connect the air compressor to your nail gun before loading the tool because the driving mechanism may fire a nail as soon as it is connected. An empty nail gun reduces that risk. Connect the air-hose valve to the 1/4 –inch stud beneath the handle.
Load the Nails
Make sure the tool is directed away from yourself and others and then open the magazine by pulling the spring-loaded slide on the magazine until it locks. Load the strip of nails into the magazine, making sure the nails are pointed towards the front of the gun. After ensuring that these nails are placed at the correct angle, unlock the slide and gently push it into the firing mechanism.
Once you load the nails, you are ready to start working. Most nail guns have a two-step safety firing mechanism that requires the nail gun to be pressed against a surface and the trigger to be pulled before firing a nail. This is to reduce the risk of accidental misfires and to ensure safety when using the tool. Make sure to keep your hand off the trigger when not firing and do not point the gun at yourself or anyone.
How To Load Brads In A Stanley Staple Gun
Loading brads is just as easy as loading regular-sized nails. Before loading the brads, make sure the staple or brad nail gun is switched off and completely disconnected from any power or air source. Check to make sure the brads are compatible with the nail gun to prevent jamming.
After making sure the nail gun is properly disconnected, hold the nail gun upside down, squeeze the latch and pull down the magazine. Tilt the tool backwards and feed the brads into the chamber, the nail gun should have arrows that indicate how to arrange the brads. Once that is done, push the latch in and make sure the brad is laid flush against the wall of the chamber; if the nails aren’t flush, adjust it with your nails until they are.
How To Load A Ridgid Nail Gun
There are different types of ridged nail guns, but they all have similar loading mechanism. The first step is to switch off the nail gun and empty the magazine. Connect the air compressor to the gun; this is to prevent misfires that may occur if the nail gun is loaded before connecting it to the air source. After connecting the air source, get a strip of nails that are compatible with the specific type of Ridgid nail gun being used.
Read through the user’s manual for instructions on how to properly place the nails and then drop the strip of nails into the magazine. Slide the pusher back into the bottom of the magazine. Once the pusher is released, it will push the nails into the driving mechanism.
Nail Gun Safety Tips
Before loading a nail gun, there are certain safety precautions you need to follow to reduce the chances of accidents.
Read the user’s manual
Before you operate the nail gun, read through the instructions on the manual carefully. This gives you information on how to load the nail gun properly and prevents injury. The instruction manual gives you information on the location of the magazine, the pusher and the type of strips it uses. Some models have their magazine on the bottom of the machine, but others may differ.
Wear safety glasses
Before using the nail gun, wear a pair of safety glasses or goggles preferable one with a side shield. These glasses cover your eyes and protect you from flyaway nails and dust.
Turn off the nail gun before use
This is a very important procedure; make sure the nail gun is unplugged, disconnected and switched off before you load the gun and do not plug the nail gun until it has been loaded. This ensures safety while loading the gun because it eliminates the risk of accidental misfires.
Position the nail gun properly
Make sure the nose tip of the nail gun is pointed towards the ground when you are loading the nail gun; this prevents misfires. Do not point the gun at someone as this can lead to serious injury.
Conclusion
If you are a DIY enthusiast or professional contractor, the nail gun is a very good investment for you. Various types of nail guns serve various purposes, and each of these has specific loading mechanisms. It is important to follow the safety tips and procedures while using the nail gun to improve safety in your work station.