
Table of Contents
Introduction
Baseboards, also called skirtings, are a type of finish that covers the joint between walls and floors. They are installed to cover up the joints between floors and walls that may otherwise look messy. Without baseboards, a room may look tacky, so it is often recommended to install baseboards.
When you want to fix your baseboards, you must use the right nails and techniques to ensure a neat finish.
The Right Nail Gauge Sizes
Baseboards are delicate and need nails that are not too big as they will split the wood. Nails for baseboards must be fine. Check the gauge of your nail gun to nail your baseboards. Higher gauges represent thinner, finer, and shorter nails. A low gauge means the nails are bigger.
If you have a baseboard that is ¾ inch thick baseboard, you’ll need a 15 gauge finish nailer. You can nail up to a depth of 2½ with a 15 gauge nailer, which puts it in the range of the recommended length of baseboard nails. If you want to use finer nails that are easier to weld, you can opt for the 16 gauge nailer.
It is best to pre-drill your baseboards, especially if they haven’t been painted; this will make the nailing process easier and reduce your baseboards’ chances of splitting. You can get a punch at your local hardware store to pre-bore your baseboards.
Before installing your baseboards, let them stay for a day or two before fixing them; this is because wood shrinks and expands based on climate; the wood may expand or contract during this period, which will skew and distort the appearance of the room.
Why You Need to Use the Right Size of Nails
It is generally agreed that baseboard nails must not be longer than 2 inches. If your nails are longer than 2 inches, you may end up piercing and damaging pipes and wiring. On the other hand, short nails will not penetrate deep enough to be able to anchor the baseboards to the walls. It may hold it in place for a while, but the baseboards will come out after some time.
Baseboards use thin and fine nails because they leave behind little or no footprints. The nails are narrow and barely visible, which gives the baseboards a neat exterior. Any holes and defects caused by the nails can easily be fixed and covered up using wood fillers.
Tips on How to Nail Your Baseboards
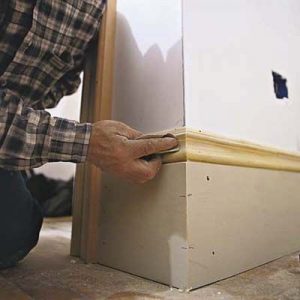
- Place the baseboard across the wall you want to install it on and cut it to size to fit perfectly.
- Place the baseboard on the interior of the wall and make sure it fits tightly against the corner, and it flushes, then nails the ends of the board to ensure it stays in position. After nailing the first end, make sure it’s straight and secured to the wall.
- Nail in vertical pairs of nails every 16 or 14 inches intervals; and nail one towards the bottom, while the other towards the top edge of the skirting.
- Get a professional or a friend who is familiar with installing baseboards to help you out if you can’t get it done yourself.
- Always give the baseboards up to 48 hours to acclimatize to the environment before nailing it. Baseboards may shrink or expand depending on the climate of your home.
Conclusion
Always use the right gauge of nails to fix your baseboards. Remember that it is essential to use the appropriate nail size to prevent damage to the baseboard and cause the room’s disfigurement. Ensure you get good quality baseboards as this will mean it will last a long time.
Take safety precautions to avoid injuries when installing your baseboards.