
Table of Contents
Introduction
The air compressor is a very popular tool used in homes and construction sites. They are used to power pneumatic tools and are easy to use. The air compressor works with an electric motor that pushes pressurized air into a steel tank; the compressed air in the tank is then released through an air hose to power different tools. They provide power to all pneumatic tools like nail guns, drills and wrenches. There are different types of air compressors ranging from the portable to the stationary ones used for heavy-duty industrial work.
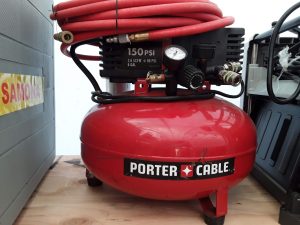
Air compressors are also produced by a lot of brands, one of which is Porter Cable. The Porter Cable is a popular brand known to produce many other power tools like nailers and drills. Just like the other Porter Cable power tools, the air compressor is built with highly durable material. It is designed to be compact and can be carried around to different work sites. A lot of people don’t prefer this brand because of the noise the machine makes when it is turned on. This noise is only produced once the air compressor is turned on, and it has nothing to do with its performance rate.
Using the Porter Cable air compressor is not rocket science, it can be done by following the easy steps provided in this article. To know more about the air compressors, see
Air Compressor Maintenance Guide
How To Use Porter Cable Air Compressor
The Porter Cable air compressor is easy to use and very safe, safer than other brands. Before we look into the list of instructions, here’s a list of equipment needed to operate the air compressor
- Adjustable wrench
- Air compressor tools
- Air compressor hose
- Plumber’s tape
- A 115-volt electric circuit
- Safety goggles
When you are about to use the air compressor, make sure all your supplies and equipment are within arm’s reach. Below are the steps to follow to use a Porter Cable air compressor
- Locate the air compressor knob, which is usually close to the air outlet. Completely turn the knob anticlockwise until it is locked in.
- Attach the air hose to the air compressor. This depends on how the air compressor is built, you can either attach it directly the outlet port or use the quick-connect fitting.
- Make sure the air compressor is turned off by flipping the switch upwards.
- Connect the air compressor to the ideal circuit. The Porter Cable air compressor is usually compatible with a 15 amp circuit.
- Turn on the switch of the air compressor. The air compressor will produce a loud noise when it comes on; don’t be worried because that is the sound of it compressing air from the atmosphere around it.
- Connect the tool to the other end of the air hose and turn the pressure regulator knob clockwise until it matches the recommended pressure for the tool.
- You can then make use of the tool. When you’re done with it, switch off the air compressor.
- Release the air pressure by opening the drain valve beneath the tank. You open the valve by turning the thumbscrew anticlockwise.
- When that is done, remove the air compressor and store it for future use.
Additional Tips to Follow When Using The Porter Cable Air Compressor
Before and when using the Porter Cable air compressor, some major steps need to be followed. These are discussed below
Read the instruction manual
There are different models of the porter cable air compressor, and each of them may function differently. This is why it is important to read the instruction manual carefully before using the machine. Look out for and take note of the different features on your model and follow the steps on the manual.
Do proper machine and engine checks
It is important to do a proper check on your machine before using it. Check the dials and knobs, look out for damages. Check if the hose is properly connected and secured; if it is not secured, it may damage the hose and the compressor. Do proper maintenance checks as often as possible. Clean and oil the engines and the compressor. This is important to maintain the durability of the machine and ensure it lasts long.
Adjust the air pressure
When the machine is on, and there is enough air pressure, you can regulate the pressure to suit the project and pneumatic tool. This is because certain projects and tools require different pressure. There are two gauges used to monitor the pressure in the tank, the Proper Air Pressure or PSI and the Air Flow or CFM. The former represents the inside the tank while the latter shows the pressure when using the air hose. Adjusting the air pressure can be done by turning the control valve until it reaches the maximum requirement for that tool. Make sure you know the exact pressure required for that tool.
Unplug and drain your compressor after use
After using the air compressor, shut off the machine and make sure the pressure gauge is turned off. When that is done, unplug the machine and drain the air in the tank. Check the pressure relief valve or leave it open to remove the air completely. Before storing your air compressor, remove any moisture that may be in the tank. Open the drain valve to remove the moisture and then tighten it after.
Wear safety glasses
It is important to have on safety goggles or glasses when using the air compressor. The air compressor is a powerful tool, and it can cause a lot of accidents if not handled with care. Safety glasses protect your eyes from flying debris or dust. For more safety precaution to follow when using the air compressor, see Air Compressor Safety Tips
Conclusion
It is a known fact that the Porter Cable Company produces top quality air compressors that will last for a very long time. They are very easy to use and come with an easy-to-understand instruction manual. If you follow the steps provided above, then using the Porter Cable air compressor will be a hassle-free task.